Wike Ridge
Our championship golf course offers 18 dramatic holes set within stunning woodland scenery.
With bunkers galore and breathtaking water hazards including a lake and fountain guarding the 18th green, Wike Ridge has been beautifully created by master course designers to offer a complete golfing experience.
Featuring our impressively long 629 yard second hole, this course is an exhilarating challenge for even scratch golfers.
Equipment Hire Prices
We have a range of equipment to hire to enhance your experience, please note that a credit card deposit is necessary for all hire items.
- Full set for Wike Ridge – £15
- Half set, irons only for The Oaks – £10
- Buggy Hire – £30 visitors, £25 members
- GPS Powakaddy Hire – £15 visitors, £12.50 members

Hole 1
Pro’s Tip:
A tricky little opener. Keep to the left side off the tee and note that the second shot always plays a bit longer than you might think.

Hole 2
Pro’s Tip:
One of the longest holes in the North – a true three-shot par-5. Important to lay up on the left side to open up your approach but beware of the pot bunker!
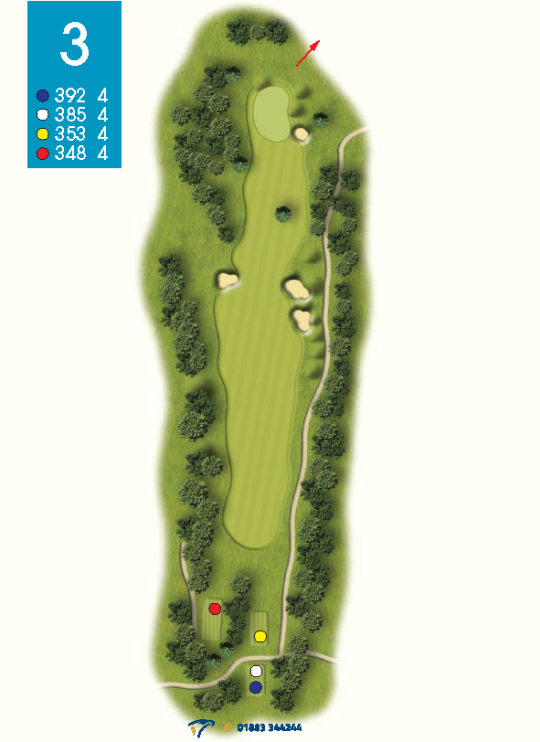
Hole 3
Pro’s Tip:
Correct club choice off the tee is vital to
avoid the bunkers and being blocked out by the lone fairway tree. Tough approach to smallest green on the course
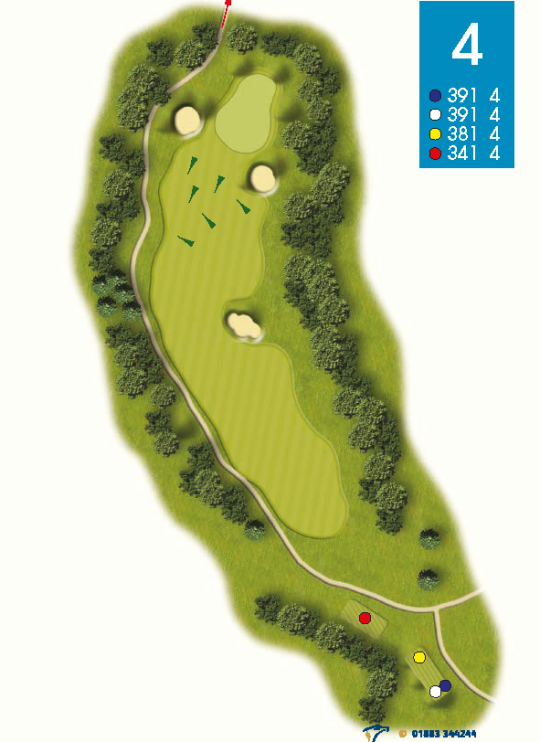
Hole 4
Pro’s Tip:
Keep down 261 the left side 251 to open up the hole and access to the sloping three-tier green. Failure to hit this green will leave a tough up and down.

Hole 5
Pro’s Tip:
Prevailing wind makes it tough to hit the right side of this green. Correct club selection is vital as the hole appears shorter than it is.

Hole 6
Pro’s Tip:
Longer hitters will have to make careful club selection from the tee. Miss-struck approach shots will most likely be gathered by the two-tier water feature.
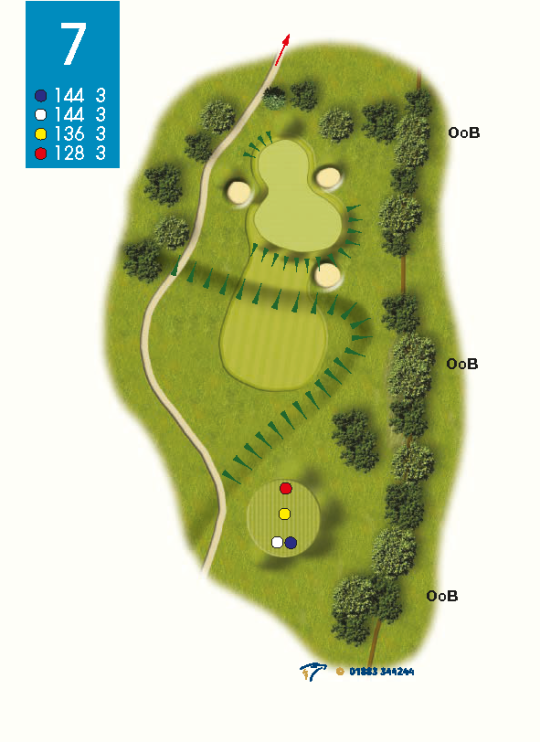
Hole 7
Pro’s Tip:
A good short par-3 to a big green sloping back to front. Check pin placement and choose your club carefully or a three-putt could be on the cards

Hole 8
Pro’s Tip:
The hardest hole on the course – a long par-4 with a tricky approach to the green. Any off-line shots could find one of the five bunkers.

Hole 9
Pro’s Tip:
Long hitters will see this as an easy birdie opportunity – however, accuracy is key off the tee a well-guarded green awaits.

Hole 10
Pro’s Tip:
Short in length, but not in challenges as a burn awaits any incorrect club selection off the tee. This undulating green can see a 3 putt appear from nowhere!

Hole 11
Pro’s Tip:
Three bunkers await inaccurate tee shots, it’s only a short hole so consider an iron? This is not a good fairway to miss as the approach requires precision.

Hole 12
Pro’s Tip:
Hookers beware as water will gather any shot going down the left. Make sure your approach is long enough as all the trouble is short here.

Hole 13
Pro’s Tip:
Our favourite par- 3, where par is a good score. A solid long iron, hybrid or fairway wood is required to reach a well guarded green.

Hole 14
Pro’s Tip:
A great par-5 off the back tees but an uncompromising par-4 off the yellows. It’s all about the approach though – risk or reward to a long, narrow green.

Hole 15
Pro’s Tip:
The shortest of our par-5s where shot placement is key. Keep long and left off the tee for a chance of hitting the green in two.

Hole 16
Pro’s Tip:
A tough, long par-3. Often plays into a prevailing wind so don’t be ashamed about hitting a wood off the tee – you will not be the first or last to do so!

Hole 17
Pro’s Tip:
Long hitters may take on the bunkers off the tee as it usually plays down-wind. Five bunkers protect an approach to this tricky undulating green.
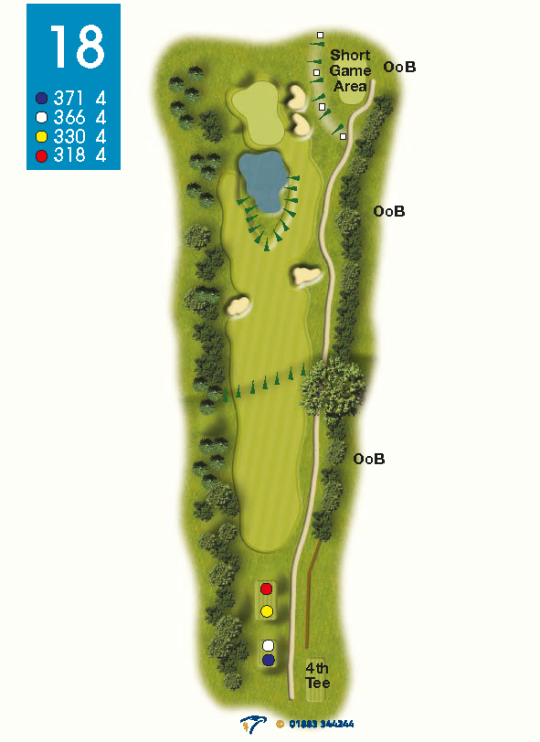
Hole 18
Pro’s Tip:
The final hole has ruined many a card by golfers trying to take on too much! A correctly positioned tee shot and careful club selection for the approach is essential.

